How to get Started
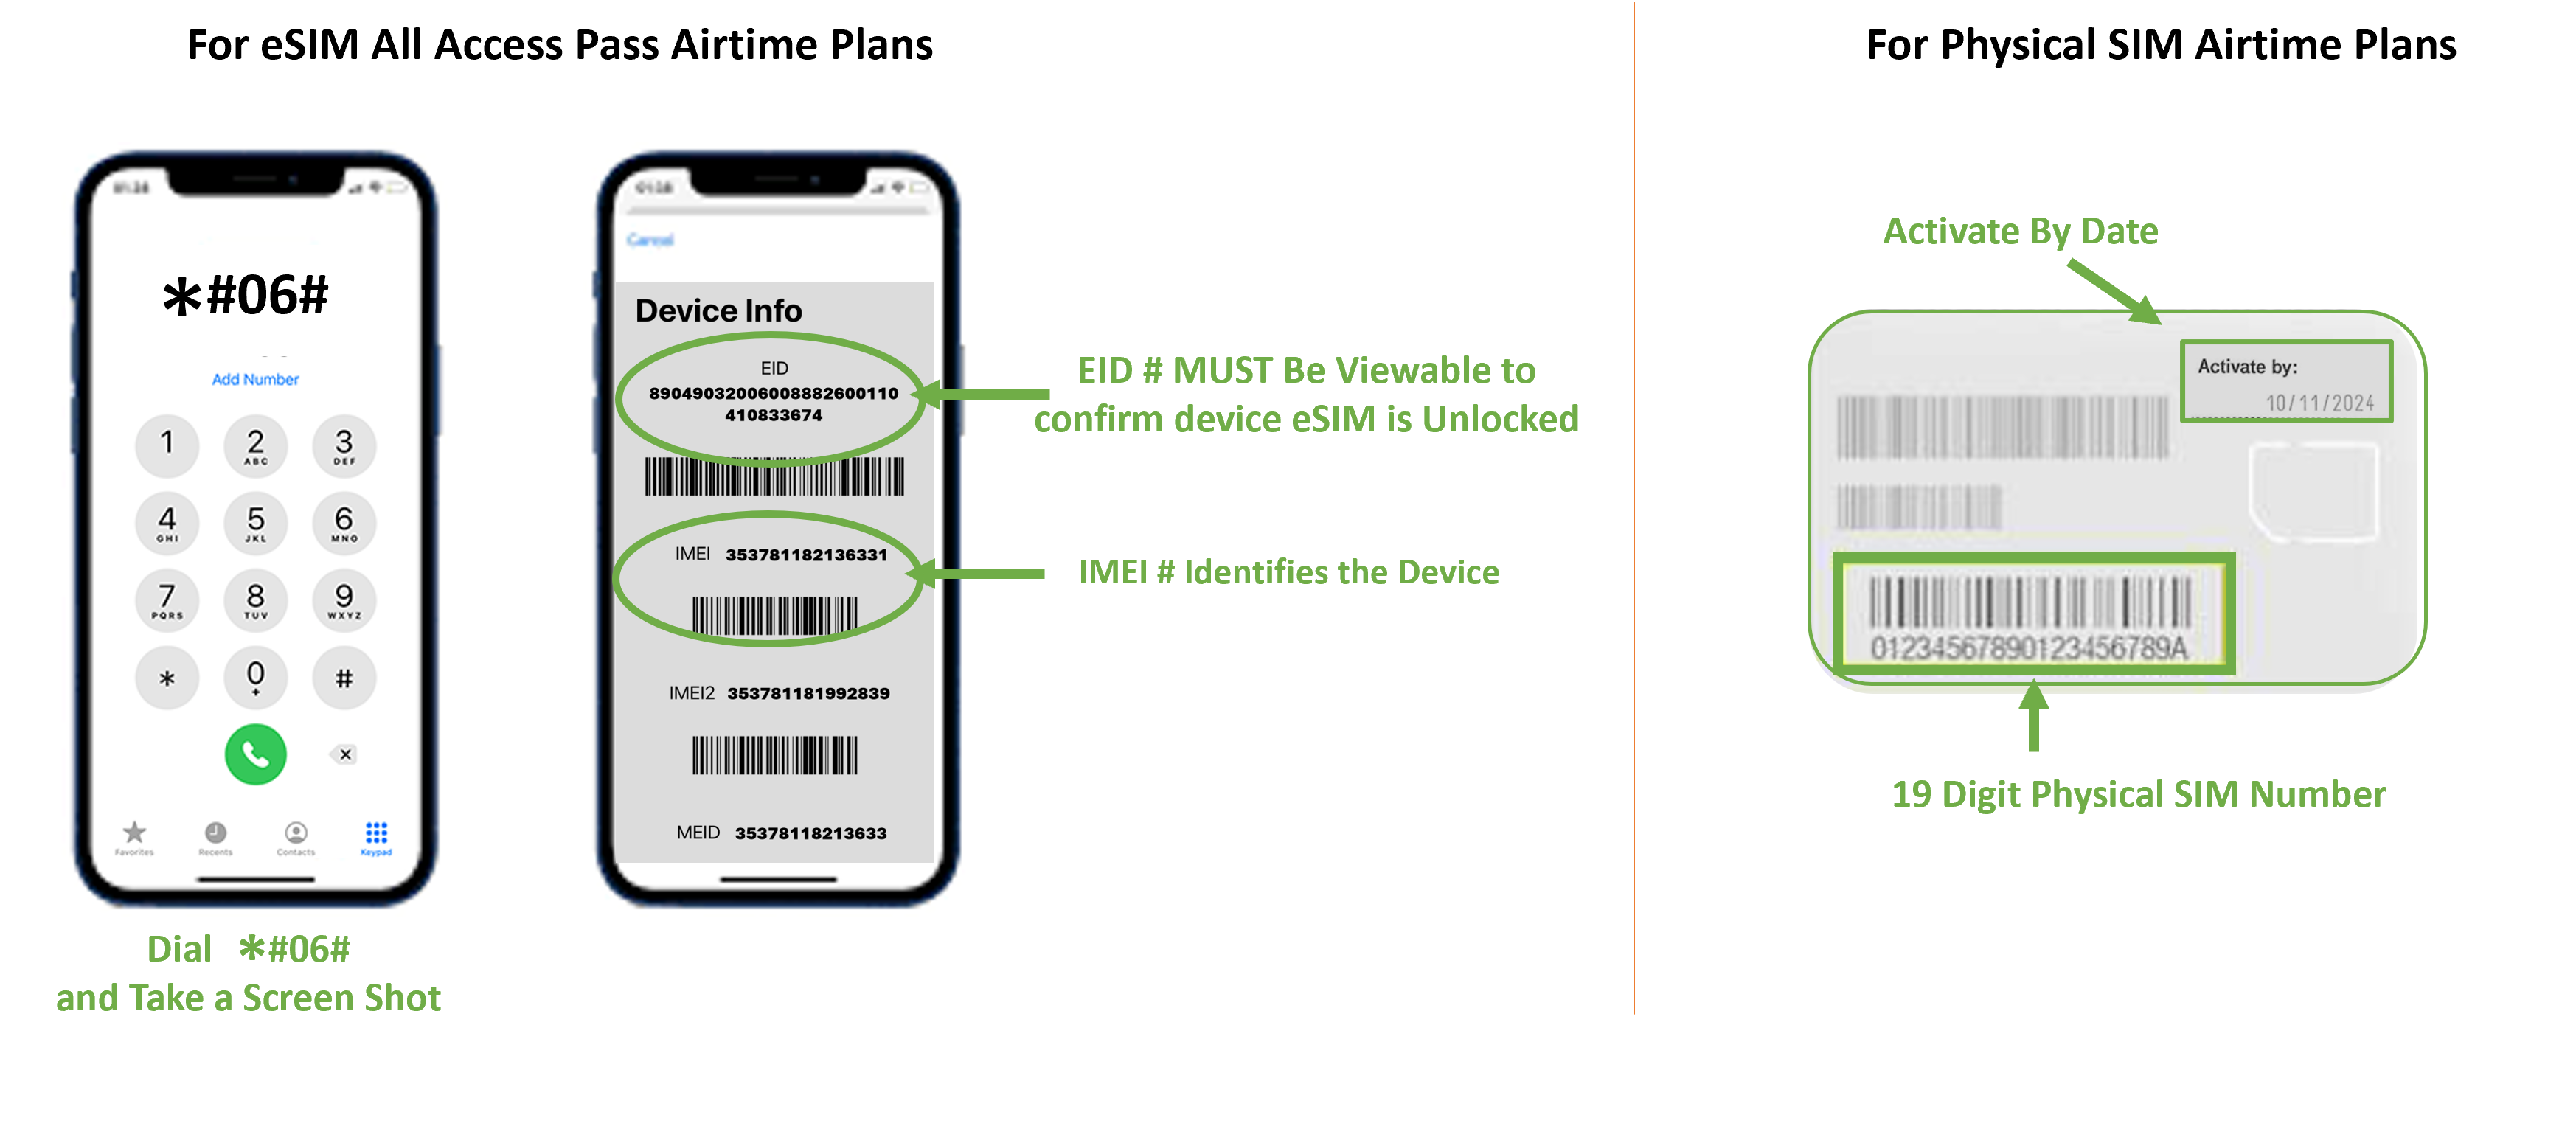
Locate your IMEI # by dialing *#06# for eSIM plans or locate your SIM card number on the back of the card issued to you. If you don’t have a SIM card or order one HERE
Go to the Activation Portal to pick a plan and enter your billing information.
Enjoy Unlimited 4G LTE & 5G data and mobile service on the best network in the USA
Troubleshooting Tips
Click on the link to the activation portal
Activate eSim All Access Pass Now
eSIM All Access Pass AIRTIME PLAN ACTIVATION INSTRUCTIONS
Schedule Activation Requests For Your Desired Airtime Rate Plans for Use on Your eSIM All Access Pass
1. Make sure your GSM Duel Sim/eSIM compatible device is UNLOCKED (only your primary carrier can unlock your device)
2. Once you have secured your eSIM All Access Pass order confirmation, Click Here If you have not secured your eSIM All Access Pass yet, go back and GET E-SIM to Order All Access Pass now. Order/Redemption instruction for your eSIM All Access Pass were issued by your travel provider.
3. Enter Your Original SmartSIM® USA Order Confirmation Number for Your eSIM ALL Access Pass (This was provided in your eSIM All Access Pass order confirmation email from SmartSIM USA®)
4. Upload & enter your Device IMEI information as you complete the step by step onscreen instructions and complete Check Out to schedule your eSIM All Access Pass Airtime Plan. (See below to access your device IMEI#)
5. Select the length of the Airtime Plan that you wish to have activated and click ACTIVATE YOUR eSIM ALL ACCESS PASS NOW
6. On the morning of the selected start date for activation, and when in the USA, simply restart your device and connect to any WiFi network to complete connection to the TMobile® network.
NOTE: YOU WILL NEED TO PROVIDE YOUR DEVICE’S IMEI NUMBER. TO FIND THIS OR ACCESS THIS, YOU CAN GO TO YOUR DEVICE SETTINGS, OR SIMPLY DIAL *#06# FROM YOUR MOBILE DEVICE AND TAKE A SCREENSHOT OF THE DEVICE INFO PAGE DISPLAYED ON YOUR DEVICE FOR CONFIRMATION AND UPLOAD WHEN PROMPTED.
DIAL *#06# FROM THE DEVICE YOUR WOULD LIKE TO SCHEDULE FOR YOUR eSIM ALL ACCESS PASS AIRTIME PLAN ACTIVATION & TAKE A SCREENSHOT OF YOUR DEVICE INFO SCREEN AND SAVE IT FOR UPLOAD DURING THE ACTIVATION SCHEDULE PROCESS.
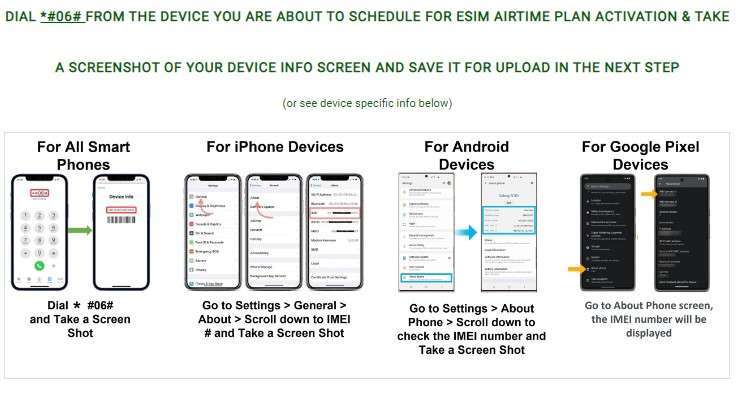
DIAL *#06# FROM THE DEVICE YOUR WOULD LIKE TO SCHEDULE FOR YOUR eSIM ALL ACCESS PASS AIRTIME PLAN ACTIVATION & TAKE A SCREENSHOT OF YOUR DEVICE INFO SCREEN AND SAVE IT FOR UPLOAD DURING THE ACTIVATION SCHEDULE PROCESS.
You can also find your IMEI and EID information from your device settings. Here are a few common devices.
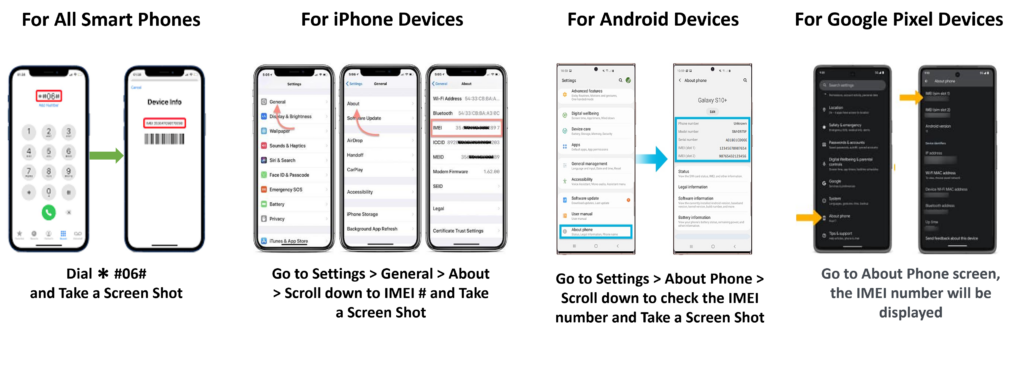
Find your IMEI number in your phone's settings.
You can find the number in your phone's settings. Here's how:
- iPhone
Go to Settings, then General, then About. - Android
Go to Settings, then About Phone, then Status. - Windows phone
Go to Settings, then About, then More information.
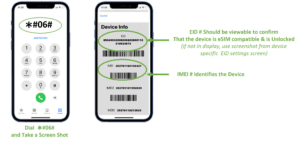
Your EID Number will have to be validated prior to connecting to any airtime plans. If your device info screenshot shared does not contain your EID number along with your IMEI number, then you may be asked to provide this info.
On most devices, this should appear when you dial *#06# to access the device info screen:

If your EID number does not appear when dialing *#06#, then below will help you find your EID from a few common devices:
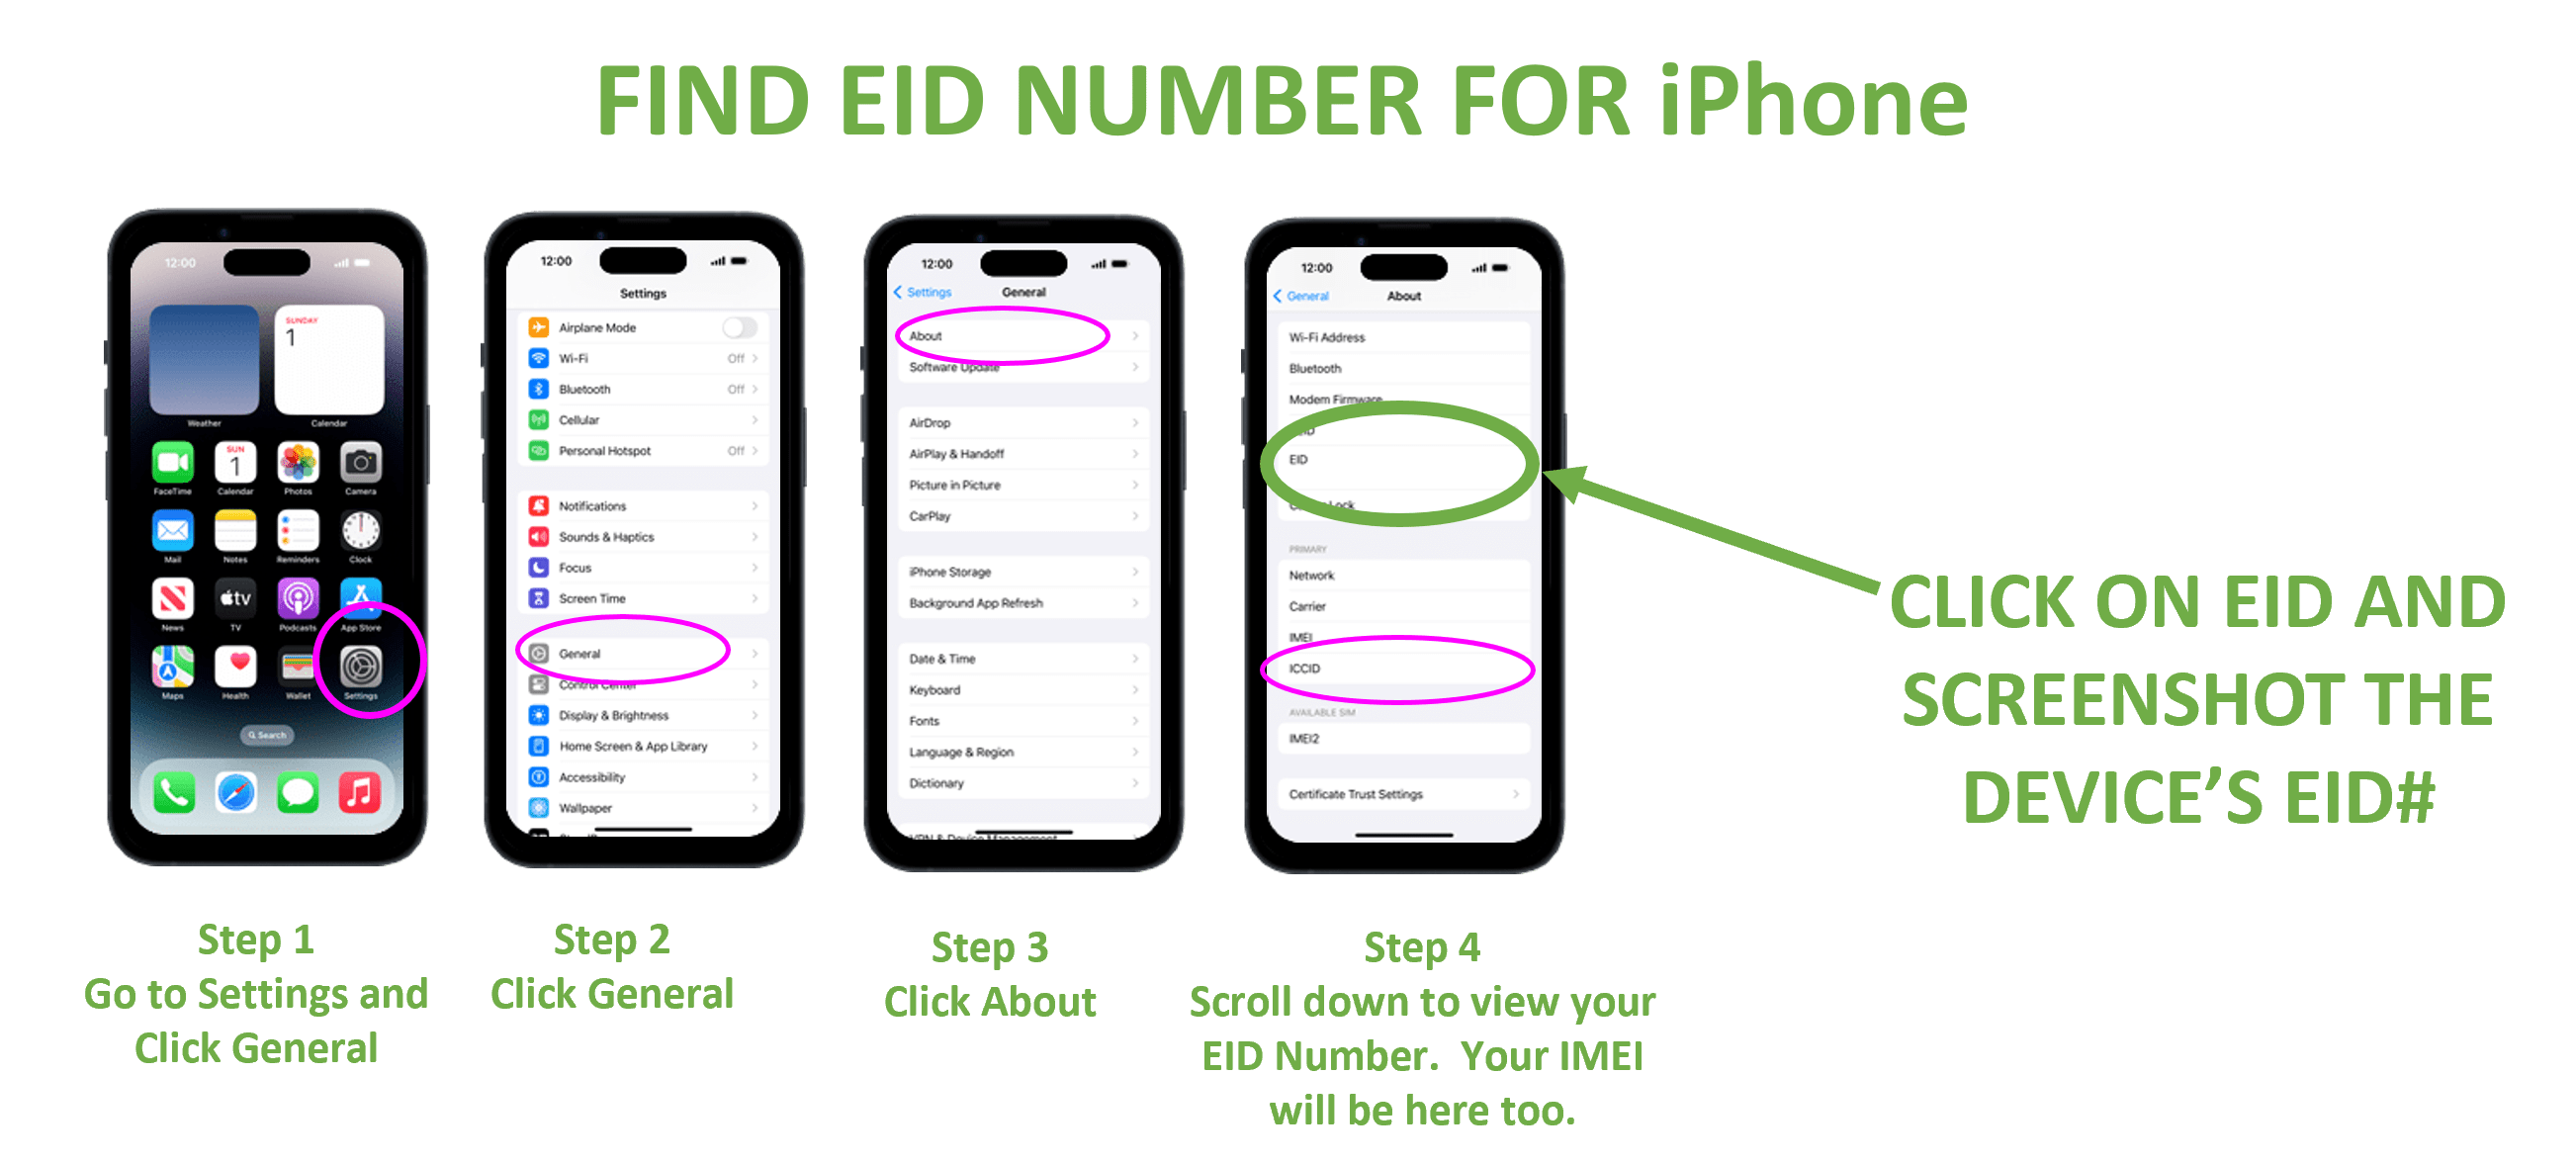
Learn more from the Apple support articles Find the serial number and other information for your iPhone and Identify your iPhone model.
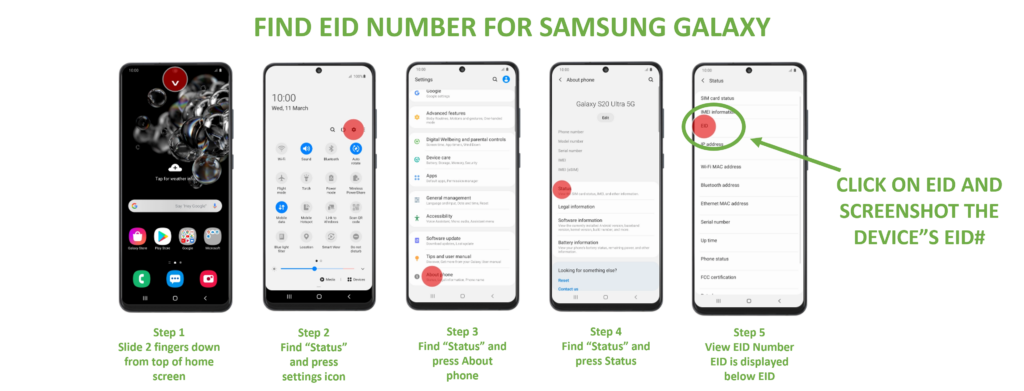
Learn More about Samsung Devices and Support

Learn More about Samsung Devices and Support
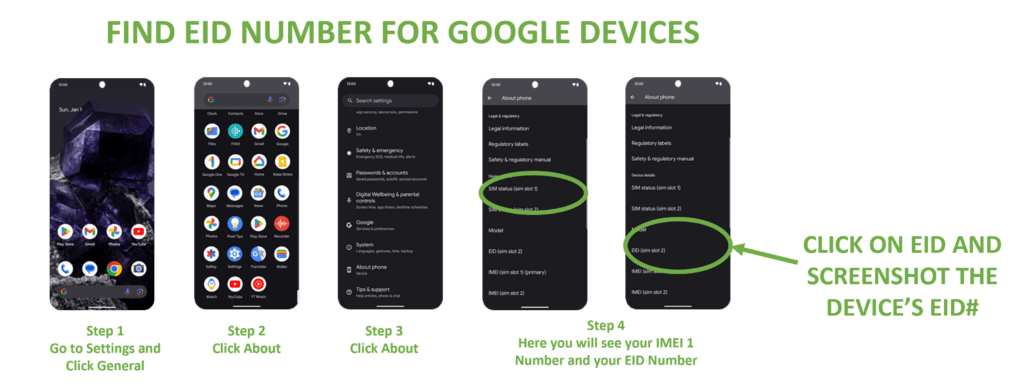
Learn More about Google Devices and Support
If your device settings or about section of your device shows an IMEI, and IMEI 2 and an EID number, then your device is likely eSIM compatible.
However, you can also click here to run our eSIM compatibility widget to check as well.
Yes
With dual SIM/eSIM compatible smartphones, you can easily switch between the lines associate with each SIM in your smartphone.
However, prior to arrival in the USA, we HIGHLY RECOMMEND that you completely turn off your primary carrier line and data from your smartphone’s device settings to avoid incurring extremely expensive data and other line fees associated with your primary carrier and line.
NOTE: UNDER NO CURCUMSTANCES CAN SMARTSIM USA BE RESPONSIBLE FOR FEES OR RATES CHARGED BY YOUR PRIMARY CARRIER. PLEASE CHECK WITH YOUR PRIMARY CARRIER IF YOU HAVE ANY QUESTIONS OR CONCERNS REGARDING FEES AND RATES THEY MAY CHARGE TO YOUR PRIMARY LINE SHOULD YOU OPT TO ALSO LEAVE THAT LINE ACTIVE WHILE IN THE USA.
There’s a few ways to set up your eSIM:
IMPORTANT: Prior to US arrival, check with your primary carrier to make sure that your mobile device is unlocked.
LINK GUIDE ON HOW TO PROPERLY SET UP eSIM
https://www.t-mobile.com/support/devices/sim-esim
During the initial setup, you'll be prompted to activate an eSIM.
If you've already set up your Phone and are connected to Wi-Fi, your Phone will prompt you when the T-Mobile Cellular Plan is ready to be installed.
Didn't get a prompt or chose to activate later?
For Apple iPhone: You can activate your eSIM from the device Settings > Cellular.
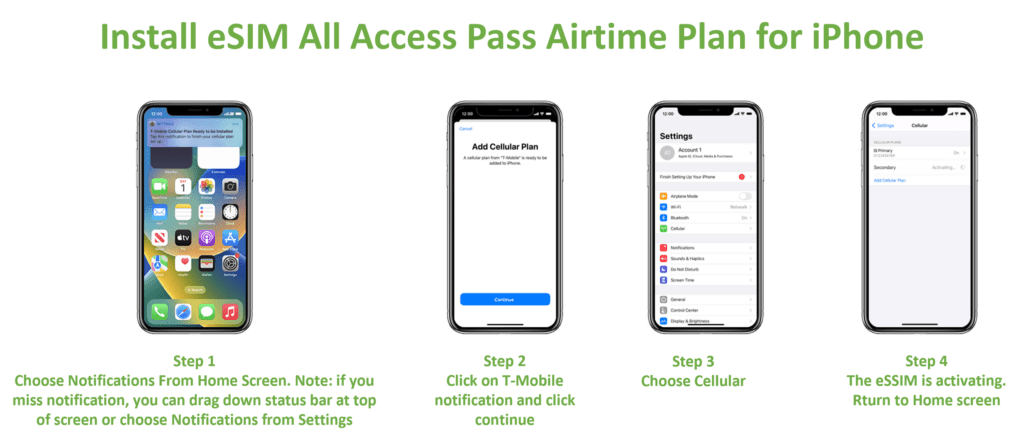
For Samsung Phones: During initial setup, you'll be prompted to activate an eSIM. Settings > Connections > SIM manager > Add eSIM.

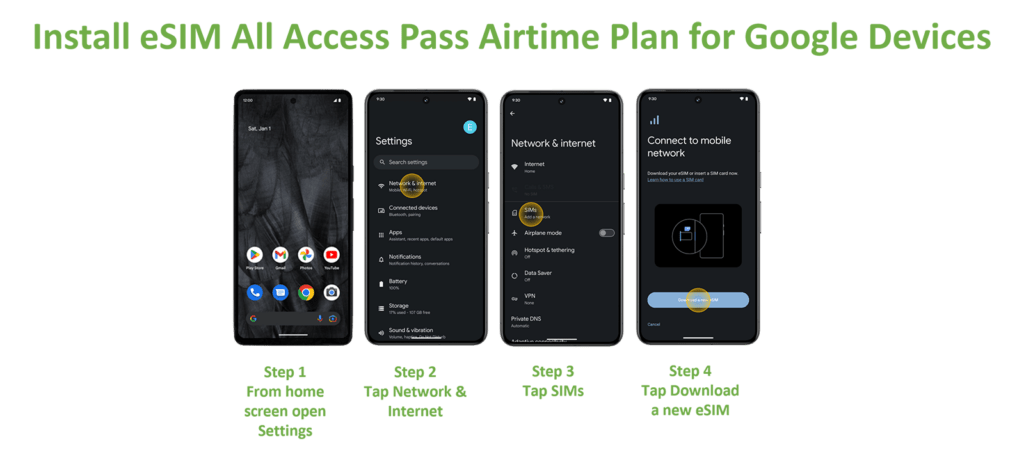
For Google Phones:
- Make sure you're connected to Wi-Fi and choose to Download your eSIMwhen you're setting up the device.
- If you’ve already completed setup, select Settings> Network & Internet, then choose the +icon to add a SIM. Select Download your SIM and follow the steps to activate your T-Mobile eSIM.
For Other Phones:
- Connect to Wi-Fi and scan the QR code. Check in Settings > Network & Internet> Mobile Network for most Androids.
- Our Tutorials have steps for supported devices, like the Motorola razr 5G.

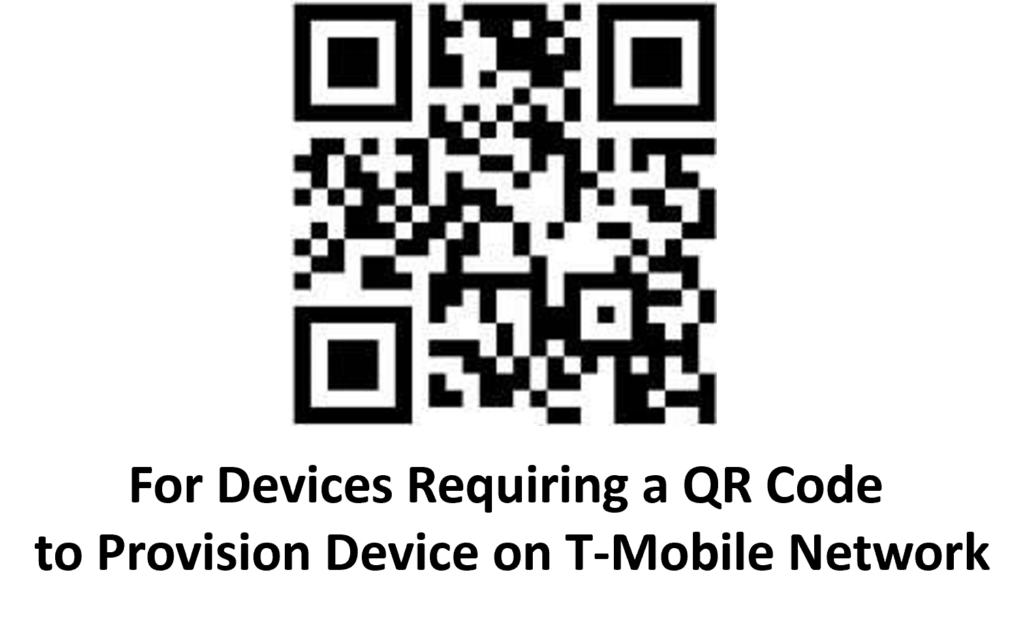
FOR ESIM Set up via QR code: Connect to Wi-Fi and scan the QR code. Check in Settings > Network & Internet > Mobile Network for most Androids.
Get more help with your eSIM
- For Apple devices, check out additional Apple eSIM troubleshooting.
- For Samsung devices, check out additional Samsung eSIM troubleshooting.
- Bringing your own device? Make sure it's compatible.
Click on the link to the activation portal
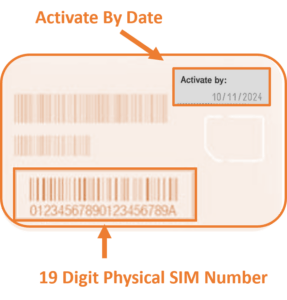
Step 1: Enter the SIM number printed on the back of your card as far in advance of your USA arrival as possible. Waiting until the last minute to select your activation start date may result in unexpected delays.
Step 2: Enter your Arrival/Activation date then pick the length of your plan
- You can choose an arrival date up to a year in advance and your SIM will be activated on the morning of the activation start date selected US Eastern Time.
- Pick the length of your plan.
Step 3: Enter your billing/payment Information
- Enter your billing/payment method (Free plans will not be charged, however, you will still need to complete billing information to confirm your identity)
- Confirm your mailing address
- Enter your email
Step 4: Checkout
Step 5: Check your email
- Your activation request confirmation with plan request detail summary will be sent to you via email immediately upon completion of your activation request.
- On the date of your requested activation start date, you will receive an email confirming the successful activation of your SIM and selected plan. At this time, your temporary US phone number shall be assigned. You will also receive a text confirmation, once you insert your SIM, reboot/restart your device in the U.S. network coverage area upon your arrival in the U.S to complete your connection to our network.
Enjoy your Holiday!!!!
Our SIM cards can be broken down into three different sizes:
These days SIM cards come in three sizes:
- Standard SIM (15 x 25mm)
- Micro SIM (12 x 15mm)
- Nano SIM (8.8 x 12.3mm)
The video below will show you how to break down the SIM to the proper size need for your particular phone and how to install the chip into a variety of popular phones.
Don’t have SIM replacement tool, don’t worry, you can use a standard paper clip with release your SIM in most mobile devices.
When you sign up for your mobile plan through the corresponding activation portal, we recommend that you sign up for a plan that covers the entire length of your stay in America to ensure you get the best value.
However, if you wish to extend your plan, simply go back to the activation portal to select your additional plan length.
NOTE: Physical Sims must be reactivated or extended within 30 days from each end date selected. Otherwise, your Physical sim will Automatically be invalidated.
Most phones purchased in Europe are already unlocked. In other parts of the world, some phone providers lock their phones so they can only be used on their own networks, and not on those of competing carriers.
Here are some tips on how to unlock prior to your visit if your device is locked :
Contact to your current provider:
If you have fulfilled the terms of your contract, your mobile provider may agree to unlock your phone.
Find an unlocking service:
For most phones, you can use an unlocking service to get your phone unlocked within 24 hours or less. Just send them your device IMEI (a unique barcode) and they will send you back the unlock code with instructions.
If you prefer to have your phone unlocked in person, visit a local mobile phone repair shop. Many offer unlocking services for most phones, but it’s always a good idea to call ahead to make sure they can unlock your specific make and model.
iPhone with eSIM
Get help if you can't activate your eSIM on your iPhone. For help with these steps, visit our pick your device on the Device tutorials page and use the search bar in upper right.
- Make sure your iPhone supports an eSIM and is on the latest software version.
- If the iPhone wasn't purchased from T-Mobile, make sure that it's unlocked.
- Make sure you're connected to a Wi-Fi network and the internet works.
- If you're not using your physical SIM card, remove it from the device.
- Select the specific error that you're getting and follow any steps.
Error: Plan cannot be added
- If you set up your device using the QR code, you may still get a notification to install the assigned cellular plan.
- Since you've already installed the cellular plan with the QR code, you can just dismiss the notification and no additional action is needed.
Notification to install the assigned cellular plan does not appear
- If you already have 2+ badge notifications in Settings, you won't be automatically prompted to install the assigned cellular plan.
- Go to Settings > Cellular > Add Cellular Plan> T-Mobile New Cellular Plan and follow the on-screen steps to download your eSIM.
Error 501: Device is incompatible or locked by your provider
- This means your iPhone is either locked or doesn't have an eSIM.
- Check if your iPhone has an eSIM.
- If it does, contact the device seller to request an unlock.
Error 503: eSIM limit reached on this device
- You don't have any more eSIM profile spaces available. You can only have 10 at a time.
- Delete one of your existing profiles and try again.
Error 504: Oops, something went wrong
- There was an issue loading the next screen.
- Make sure you have a strong Wi-Fi or Cellular connection and that you can access the internet.
Error 505: There was an issue completing your order
Contact us. It's best if you can call from a different phone than the one you are having issues with
Error 511, 514, 518, 531, 534, 538
There was an issue transferring your eSIM. Try to transfer your eSIM using manual setup. If that doesn't work, contact us for assistance changing your eSIM and downloading the eSIM profile.
Error 512, 515, 516, 532, 535, 536, 539, 540
Contact us for assistance changing your eSIM and downloading the eSIM profile.
Error 513, 533
We're having trouble connecting over your Wi-Fi Connection. Follow our Wi-Fi browsing troubleshooting.
Error 517
Your account has a security restriction; you'll need to contact us so we can assist with setting up your eSIM.
Samsung Phone with Dual SIM/eSIM
Get help if you can't activate your eSIM. For help with these steps, pick your device on the Device tutorials page and use the search bar.
- If the device wasn't purchased from T-Mobile, make sure that it's unlocked.
- Make sure you're connected to a Wi-Fi network and the internet works.
- Update the device software to the latest version.
- Restart your device and try again.
- Select the specific errors that you're getting and follow any steps.
Error 525
- This means you're not authorized to make changes on the account.
- Have the primary account holder log in using their T-Mobile ID when activating.
Error 528
- The device is unable to connect to the internet over Wi-Fi.
- Make sure you're connected to Wi-Fi and can access the internet, then try again.
SmartSIM USA data & APN settings
When you get a new phone, services like the internet and picture messaging just… work. What makes this happen? Magic? Access points? Wonkavision? Well, we’re not going to let the secret out, but when you buy a phone from SmartSIM USA , we make sure you’re ready to go right out of the box. If you bring your own unlocked device to SmartSIM USA , there are a few extra settings that you’ll need to enter to get going. Thankfully we’ve got your back, and the settings, right here. Access point name (APN) settings This document will walk you through setting up internet and pictures messaging (MMS) on a non-SmartSIM USA phone, but there are a few things to keep in mind before you get started:- We can’t guarantee these settings will make an unsupported device fully functional on the SmartSIM USA network
- Customer Care isn’t able to help with unsupported device configuration, but you can always ask questions
- You can read the Non-SmartSIM USA phone & software disclaimer for more info
- Access Point Name (APN): fast.SmartSIM USA .com
- MMSC Server: http://mms.msg.eng.SmartSIM USA .com/mms/wapenc
- SMS Email:[email protected]
- SMS center: +12063130004
- Email center: 500
- Voicemail +18056377243 (1-805-MESSAGE)
Android APN settings
- Open the Access Point Names or APNs menu.
- In Settings, look under Wireless & Networks or tap the Connections tab.
- Touch Mobile network. You may need to touch More settings, More…, or More networks first.
- Touch Access Point Names.
- Touch the SmartSIM USA APN if one is available. If not, press the Menu key and touch new APN.
- Verify and update the following settings for the Data APN.
-
- Name: SmartSIM USA
- APN: Fast.SmartSIM USA .com (for LTE devices) or epc.tmobile.com (for non-LTE devices)
- Proxy:
- Port:
- Username:
- Password:
- Server:
- MMSC: http://mms.msg.eng.SmartSIM USA .com/mms/wapenc
- MMS proxy:
- MMS port:
- MMS protocol: WAP 2.0
- MCC: 310
- MNC: 260
- Authentication Type:
- APN Type: default,supl,mms OR Internet+MMS
- Default Android provides a text field to enter: default,supl,mms.
- Samsung provides an Internet+MMS radio button to select.
- APN Protocol: IPv4/IPv6
- APN roaming protocol: IPv4
- Turn APN on/off: Grayed out unless there are multiple APNs
- Bearer: Unspecified
- Press the Menu key.
- Touch Save.
- Delete any other APNs that appear in the list. The FOTA APN can remain if available.
- Touch the APN that needs to be removed.
- Press the Menu key.
- Touch Delete APN.
- Verify there is a circle next to the remaining APN.
- Perform a soft reset. Hold down the power button until the device turns off and restarts.
- Test the data connection and/or MMS by accessing the Web or sending a picture message.
- Complete additional troubleshooting if the APN settings are correct, but customers still experience issues.
- From the home screen, tap Options.
- Tap Network Connections.
- Tap Mobile Network.
- Tap APN at the bottom of the screen.
- Enter the required APN information.
- Tap Save at the top of the screen.
- From the Home screen, scroll to and select Options.
- Perform one of the following (depending on your device software version):
- For BlackBerry OS 4.0 or older select TCP / IP.
- For BlackBerry OS 4.1 to 5.0 select Advanced Options > TCP / IP.
- For BlackBerry OS 6.0 or newer select Device > Advanced System Settings > TCP / IP
- Enter the required APN information.
- Select Save.
Click on the link to the activation portal
Activate eSim All Access Pass Now
eSIM All Access Pass AIRTIME PLAN ACTIVATION INSTRUCTIONS
Schedule Activation Requests For Your Desired Airtime Rate Plans for Use on Your eSIM All Access Pass
1. Make sure your GSM Duel Sim/eSIM compatible device is UNLOCKED (only your primary carrier can unlock your device)
2. Once you have secured your eSIM All Access Pass order confirmation, Click Here If you have not secured your eSIM All Access Pass yet, go back and GET E-SIM to Order All Access Pass now. Order/Redemption instruction for your eSIM All Access Pass were issued by your travel provider.
3. Enter Your Original SmartSIM® USA Order Confirmation Number for Your eSIM ALL Access Pass (This was provided in your eSIM All Access Pass order confirmation email from SmartSIM USA®)
4. Upload & enter your Device IMEI information as you complete the step by step onscreen instructions and complete Check Out to schedule your eSIM All Access Pass Airtime Plan. (See below to access your device IMEI#)
5. Select the length of the Airtime Plan that you wish to have activated and click ACTIVATE YOUR eSIM ALL ACCESS PASS NOW
6. On the morning of the selected start date for activation, and when in the USA, simply restart your device and connect to any WiFi network to complete connection to the TMobile® network.
NOTE: YOU WILL NEED TO PROVIDE YOUR DEVICE’S IMEI NUMBER. TO FIND THIS OR ACCESS THIS, YOU CAN GO TO YOUR DEVICE SETTINGS, OR SIMPLY DIAL *#06# FROM YOUR MOBILE DEVICE AND TAKE A SCREENSHOT OF THE DEVICE INFO PAGE DISPLAYED ON YOUR DEVICE FOR CONFIRMATION AND UPLOAD WHEN PROMPTED.
DIAL *#06# FROM THE DEVICE YOUR WOULD LIKE TO SCHEDULE FOR YOUR eSIM ALL ACCESS PASS AIRTIME PLAN ACTIVATION & TAKE A SCREENSHOT OF YOUR DEVICE INFO SCREEN AND SAVE IT FOR UPLOAD DURING THE ACTIVATION SCHEDULE PROCESS.

DIAL *#06# FROM THE DEVICE YOUR WOULD LIKE TO SCHEDULE FOR YOUR eSIM ALL ACCESS PASS AIRTIME PLAN ACTIVATION & TAKE A SCREENSHOT OF YOUR DEVICE INFO SCREEN AND SAVE IT FOR UPLOAD DURING THE ACTIVATION SCHEDULE PROCESS.

You can also find your IMEI and EID information from your device settings. Here are a few common devices.

Find your IMEI number in your phone's settings.
You can find the number in your phone's settings. Here's how:
- iPhone
Go to Settings, then General, then About. - Android
Go to Settings, then About Phone, then Status. - Windows phone
Go to Settings, then About, then More information.
Your EID Number will have to be validated prior to connecting to any airtime plans. If your device info screenshot shared does not contain your EID number along with your IMEI number, then you may be asked to provide this info.
On most devices, this should appear when you dial *#06# to access the device info screen:
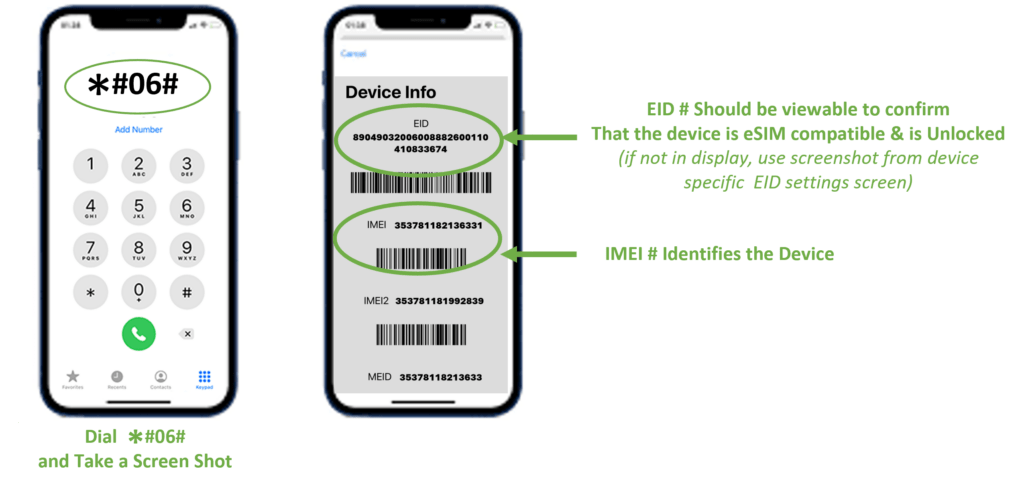
If your EID number does not appear when dialing *#06#, then below will help you find your EID from a few common devices:


If your device settings or about section of your device shows an IMEI, and IMEI 2 and an EID number, then your device is likely eSIM compatible.
However, you can also click here to run our eSIM compatibility widget to check as well.
Yes
With dual SIM/eSIM compatible smartphones, you can easily switch between the lines associate with each SIM in your smartphone.
However, prior to arrival in the USA, we HIGHLY RECOMMEND that you completely turn off your primary carrier line and data from your smartphone’s device settings to avoid incurring extremely expensive data and other line fees associated with your primary carrier and line.
NOTE: UNDER NO CURCUMSTANCES CAN SMARTSIM USA BE RESPONSIBLE FOR FEES OR RATES CHARGED BY YOUR PRIMARY CARRIER. PLEASE CHECK WITH YOUR PRIMARY CARRIER IF YOU HAVE ANY QUESTIONS OR CONCERNS REGARDING FEES AND RATES THEY MAY CHARGE TO YOUR PRIMARY LINE SHOULD YOU OPT TO ALSO LEAVE THAT LINE ACTIVE WHILE IN THE USA.
There’s a few ways to set up your eSIM:
IMPORTANT: Prior to US arrival, check with your primary carrier to make sure that your mobile device is unlocked.
LINK GUIDE ON HOW TO PROPERLY SET UP eSIM
https://www.t-mobile.com/support/devices/sim-esim
During the initial setup, you'll be prompted to activate an eSIM.
If you've already set up your Phone and are connected to Wi-Fi, your Phone will prompt you when the T-Mobile Cellular Plan is ready to be installed.
Didn't get a prompt or chose to activate later?
For Apple iPhone: You can activate your eSIM from the device Settings > Cellular.

For Samsung Phones: During initial setup, you'll be prompted to activate an eSIM. Settings > Connections > SIM manager > Add eSIM.

For Google Phones:
- Make sure you're connected to Wi-Fi and choose to Download your eSIMwhen you're setting up the device.
- If you’ve already completed setup, select Settings> Network & Internet, then choose the +icon to add a SIM. Select Download your SIM and follow the steps to activate your T-Mobile eSIM.
For Other Phones:
- Connect to Wi-Fi and scan the QR code. Check in Settings > Network & Internet> Mobile Network for most Androids.
- Our Tutorials have steps for supported devices, like the Motorola razr 5G.

FOR ESIM Set up via QR code: Connect to Wi-Fi and scan the QR code. Check in Settings > Network & Internet > Mobile Network for most Androids.

Get more help with your eSIM
- For Apple devices, check out additional Apple eSIM troubleshooting.
- For Samsung devices, check out additional Samsung eSIM troubleshooting.
- Bringing your own device? Make sure it's compatible.
Click on the link to the activation portal
Step 1: Enter the SIM number printed on the back of your card as far in advance of your USA arrival as possible. Waiting until the last minute to select your activation start date may result in unexpected delays.

Step 2: Enter your Arrival/Activation date then pick the length of your plan
- You can choose an arrival date up to a year in advance and your SIM will be activated on the morning of the activation start date selected US Eastern Time.
- Pick the length of your plan.
Step 3: Enter your billing/payment Information
- Enter your billing/payment method (Free plans will not be charged, however, you will still need to complete billing information to confirm your identity)
- Confirm your mailing address
- Enter your email
Step 4: Checkout
Step 5: Check your email
- Your activation request confirmation with plan request detail summary will be sent to you via email immediately upon completion of your activation request.
- On the date of your requested activation start date, you will receive an email confirming the successful activation of your SIM and selected plan. At this time, your temporary US phone number shall be assigned. You will also receive a text confirmation, once you insert your SIM, reboot/restart your device in the U.S. network coverage area upon your arrival in the U.S to complete your connection to our network.
Enjoy your Holiday!!!!
Our SIM cards can be broken down into three different sizes:
These days SIM cards come in three sizes:
- Standard SIM (15 x 25mm)
- Micro SIM (12 x 15mm)
- Nano SIM (8.8 x 12.3mm)
The video below will show you how to break down the SIM to the proper size need for your particular phone and how to install the chip into a variety of popular phones.
Don’t have SIM replacement tool, don’t worry, you can use a standard paper clip with release your SIM in most mobile devices.
When you sign up for your mobile plan through the corresponding activation portal, we recommend that you sign up for a plan that covers the entire length of your stay in America to ensure you get the best value.
However, if you wish to extend your plan, simply go back to the activation portal to select your additional plan length.
NOTE: Physical Sims must be reactivated or extended within 30 days from each end date selected. Otherwise, your Physical sim will Automatically be invalidated.
Most phones purchased in Europe are already unlocked. In other parts of the world, some phone providers lock their phones so they can only be used on their own networks, and not on those of competing carriers.
Here are some tips on how to unlock prior to your visit if your device is locked :
Contact to your current provider:
If you have fulfilled the terms of your contract, your mobile provider may agree to unlock your phone.
Find an unlocking service:
For most phones, you can use an unlocking service to get your phone unlocked within 24 hours or less. Just send them your device IMEI (a unique barcode) and they will send you back the unlock code with instructions.
If you prefer to have your phone unlocked in person, visit a local mobile phone repair shop. Many offer unlocking services for most phones, but it’s always a good idea to call ahead to make sure they can unlock your specific make and model.
iPhone with eSIM
Get help if you can't activate your eSIM on your iPhone. For help with these steps, visit our pick your device on the Device tutorials page and use the search bar in upper right.
- Make sure your iPhone supports an eSIM and is on the latest software version.
- If the iPhone wasn't purchased from T-Mobile, make sure that it's unlocked.
- Make sure you're connected to a Wi-Fi network and the internet works.
- If you're not using your physical SIM card, remove it from the device.
- Select the specific error that you're getting and follow any steps.
Error: Plan cannot be added
- If you set up your device using the QR code, you may still get a notification to install the assigned cellular plan.
- Since you've already installed the cellular plan with the QR code, you can just dismiss the notification and no additional action is needed.
Notification to install the assigned cellular plan does not appear
- If you already have 2+ badge notifications in Settings, you won't be automatically prompted to install the assigned cellular plan.
- Go to Settings > Cellular > Add Cellular Plan> T-Mobile New Cellular Plan and follow the on-screen steps to download your eSIM.
Error 501: Device is incompatible or locked by your provider
- This means your iPhone is either locked or doesn't have an eSIM.
- Check if your iPhone has an eSIM.
- If it does, contact the device seller to request an unlock.
Error 503: eSIM limit reached on this device
- You don't have any more eSIM profile spaces available. You can only have 10 at a time.
- Delete one of your existing profiles and try again.
Error 504: Oops, something went wrong
- There was an issue loading the next screen.
- Make sure you have a strong Wi-Fi or Cellular connection and that you can access the internet.
Error 505: There was an issue completing your order
Contact us. It's best if you can call from a different phone than the one you are having issues with
Error 511, 514, 518, 531, 534, 538
There was an issue transferring your eSIM. Try to transfer your eSIM using manual setup. If that doesn't work, contact us for assistance changing your eSIM and downloading the eSIM profile.
Error 512, 515, 516, 532, 535, 536, 539, 540
Contact us for assistance changing your eSIM and downloading the eSIM profile.
Error 513, 533
We're having trouble connecting over your Wi-Fi Connection. Follow our Wi-Fi browsing troubleshooting.
Error 517
Your account has a security restriction; you'll need to contact us so we can assist with setting up your eSIM.
Samsung Phone with Dual SIM/eSIM
Get help if you can't activate your eSIM. For help with these steps, pick your device on the Device tutorials page and use the search bar.
- If the device wasn't purchased from T-Mobile, make sure that it's unlocked.
- Make sure you're connected to a Wi-Fi network and the internet works.
- Update the device software to the latest version.
- Restart your device and try again.
- Select the specific errors that you're getting and follow any steps.
Error 525
- This means you're not authorized to make changes on the account.
- Have the primary account holder log in using their T-Mobile ID when activating.
Error 528
- The device is unable to connect to the internet over Wi-Fi.
- Make sure you're connected to Wi-Fi and can access the internet, then try again.
SmartSIM USA data & APN settings
When you get a new phone, services like the internet and picture messaging just… work. What makes this happen? Magic? Access points? Wonkavision? Well, we’re not going to let the secret out, but when you buy a phone from SmartSIM USA , we make sure you’re ready to go right out of the box. If you bring your own unlocked device to SmartSIM USA , there are a few extra settings that you’ll need to enter to get going. Thankfully we’ve got your back, and the settings, right here. Access point name (APN) settings This document will walk you through setting up internet and pictures messaging (MMS) on a non-SmartSIM USA phone, but there are a few things to keep in mind before you get started:- We can’t guarantee these settings will make an unsupported device fully functional on the SmartSIM USA network
- Customer Care isn’t able to help with unsupported device configuration, but you can always ask questions
- You can read the Non-SmartSIM USA phone & software disclaimer for more info
- Access Point Name (APN): fast.SmartSIM USA .com
- MMSC Server: http://mms.msg.eng.SmartSIM USA .com/mms/wapenc
- SMS Email:[email protected]
- SMS center: +12063130004
- Email center: 500
- Voicemail +18056377243 (1-805-MESSAGE)
Android APN settings
- Open the Access Point Names or APNs menu.
- In Settings, look under Wireless & Networks or tap the Connections tab.
- Touch Mobile network. You may need to touch More settings, More…, or More networks first.
- Touch Access Point Names.
- Touch the SmartSIM USA APN if one is available. If not, press the Menu key and touch new APN.
- Verify and update the following settings for the Data APN.
-
- Name: SmartSIM USA
- APN: Fast.SmartSIM USA .com (for LTE devices) or epc.tmobile.com (for non-LTE devices)
- Proxy:
- Port:
- Username:
- Password:
- Server:
- MMSC: http://mms.msg.eng.SmartSIM USA .com/mms/wapenc
- MMS proxy:
- MMS port:
- MMS protocol: WAP 2.0
- MCC: 310
- MNC: 260
- Authentication Type:
- APN Type: default,supl,mms OR Internet+MMS
- Default Android provides a text field to enter: default,supl,mms.
- Samsung provides an Internet+MMS radio button to select.
- APN Protocol: IPv4/IPv6
- APN roaming protocol: IPv4
- Turn APN on/off: Grayed out unless there are multiple APNs
- Bearer: Unspecified
- Press the Menu key.
- Touch Save.
- Delete any other APNs that appear in the list. The FOTA APN can remain if available.
- Touch the APN that needs to be removed.
- Press the Menu key.
- Touch Delete APN.
- Verify there is a circle next to the remaining APN.
- Perform a soft reset. Hold down the power button until the device turns off and restarts.
- Test the data connection and/or MMS by accessing the Web or sending a picture message.
- Complete additional troubleshooting if the APN settings are correct, but customers still experience issues.
- From the home screen, tap Options.
- Tap Network Connections.
- Tap Mobile Network.
- Tap APN at the bottom of the screen.
- Enter the required APN information.
- Tap Save at the top of the screen.
- From the Home screen, scroll to and select Options.
- Perform one of the following (depending on your device software version):
- For BlackBerry OS 4.0 or older select TCP / IP.
- For BlackBerry OS 4.1 to 5.0 select Advanced Options > TCP / IP.
- For BlackBerry OS 6.0 or newer select Device > Advanced System Settings > TCP / IP
- Enter the required APN information.
- Select Save.


